Taco Pie (31 Days: Day 9)

I got the original recipe for this dish from, I think, the Kraft website. (I'm sorry. I can't find the original version now. If I could, I would link to it.) I changed it so my family would eat it. Here's my version.

You will need ground beef, flour or corn tortillas, diced tomatoes, taco seasoning and shredded cheese.


Preheat your oven to 350 degrees. Brown your ground beef.


And drain it.


Cut your tortillas to fit inside a 9x13 casserole dish that you have sprayed with non-stick spray. You'll want two layers of tortillas. Just take the extra bits you cut off and fill in the gaps. I usually spread a can of refried beans over my tortillas to add a little fiber and whatnot, but I was out. It made me sad. So just pretend that there's a picture of refried beans spread over flour tortillas in my pretty blue Pyrex dish.


In the same skillet you browned your ground beef in, mix the tomatoes and taco seasoning into your drained, browned ground beef. If you feel the need to, add a little water. Let this simmer until most of the liquid is evaporated.


Spread your taco meat over the tortillas.


Add just a little shredded cheese to help the next layer of tortillas stick.


Add the second layer of tortillas, cutting them as needed to fit.


Cover with a good layer of shredded cheese.


Throw it in the oven just long enough to ensure everything is heated well, and your cheese melts.


Serve with sour cream, salsa, or anything else you'd like.


The recap:

Ingredients
1 pound ground beef
1 package burrito sized tortillas (10 count)
1 can diced tomatoes
1 can refried beans (optional)
1 package taco seasoning
3 cups shredded cheese

Directions
1. Preheat oven to 350 degrees.

2. Brown ground beef in skillet over medium heat. Drain.

3. Return ground beef to skillet. Add tomatoes and taco seasoning. Add a little water if needed. Simmer until heated through and most of the liquid evaporates.

4. Spray a 9x13 casserole dish with non-stick spray. Place half the tortillas in the bottom, cutting to fit. Use scraps to cover gaps.

5. Spread refried beans over tortillas.

6. Spread taco meat over beans.

7. Sprinkle one cup of shredded cheese over meat. Top with remaining tortillas.

8. Top with remaining shredded cheese.

9. Bake at 350 degrees until heated through and cheese is melted.

10. Serve with sour cream, salsa, and any other desired toppings.

Fried Pork Chops (31 Days: Day 8)

OK, so this is kinda cheating today, but I'm gonna do it anyway. There is only one way my little sister will eat pork chops. To get her to eat them, you have to fry them. But you can't just dredge them in flour. No way, Jose. You have to cook them Christy Jordan style. To get the recipe from today's post, you'll have to visit SouthernPlate.com. Her recipe for Crispy Breaded Pork Chops can be found there, along with a lot of other really great recipes.

I will tell you that I cheat and add about a cup of plain bread crumbs to my breading. I also add a couple of tablespoons of McCormick Grill Mates Pork Rub.

So sorry I cheated (kinda) today. I just can't bring myself to post Christy's recipe here. She's worked hard to build her blog, and she's a North Alabamian like myself.

***I have no affiliation with McCormick or Christy Jordan (or Southern Plate), other than I love their seasoning blends and her recipes. I can't wait for her new cookbook to hit the shelves. No one paid me or otherwise compensated me to write this post. I just had to share THE BEST fried pork chop recipe EVER with all of you.

Capellini Pomodoro and Garlic Bread (31 Days: Day 7)

I love Olive Garden's Capellini Pomodoro. A lot. So much that I got on their website and looked up their recipe. But fresh tomatoes can be expensive certain times of the year, so I modified their recipe to use canned tomatoes. If you want the original Olive Garden Capellini Pomodoro recipe, go here.

This recipe for Capellini Pomodoro will serve 6-8 people, and twelve pieces of garlic bread should serve six people. It barely served the four of us. We're pigs. We're ok with that.

For my version of this dish, you will need six cans of petite diced tomatoes, a few cloves of garlic, a box of angel hair pasta, olive oil, dried basil, salt and pepper.

(I know, the picture has thin spaghetti in it. I was out of angel hair pasta, so I used this instead. It works. Regular spaghetti or fettuccine would be an acceptable substitute, also. Any really thin and long pasta would work.)


Fill a large pot with water and put it on to boil. While you wait on the water, open and drain your tomatoes. You don't want a lot of juice in this dish.


My bowl was exactly as deep as my colander, so I placed a small bowl, upside down, in my mixing bowl under my colander so it would drain correctly.


When your pasta water is boiling, add your noodles.


Throw the tomatoes, a few cloves of minced garlic, olive oil, basil, salt and pepper into a skillet over medium heat.


Check and stir your pasta. To test your pasta to see if it is cooked correctly, gently throw a few noodles on the wall, ceiling, or fridge when you think it's done. (Yes, I'm serious here. I worked with a man of Italian descent who told me this is the true way to tell if spaghetti-shaped pasta is cooked to the correct firmness. You just have to throw it at a smooth surface. Swear.) If it sticks, it's cooked perfectly. (As the pasta cools, it should fall off of whatever you threw it on.) Drain your pasta. Toss it with a little olive oil to keep it from sticking together. While you're at it, stir your tomatoes, too.


See? Mine is done. I told you I throw pasta across the kitchen when I cook. Well, fettuccini or spaghetti-shaped pasta, anyway.

For the garlic bread, you're gonna need another few cloves of garlic, some butter, basil, and slices of bread. The bread can be French bread, Texas toast, white bread, hamburger buns, whatever. Seriously, hamburger buns make delicious garlic bread. Try it. You'll like it. (Anyone know what movie I just quoted?) Go ahead and preheat your oven to 350 degrees.


Mince the garlic and add it to a few heaping spoonfuls of butter. Add in a bit of dried basil. Stir it up.


I'm using some of my homemade white bread for the garlic bread. I need to use it up so I can bake more to post for you guys. That's twelve slices of bread on my cutting board.


Slather your bread with the garlic butter.


Pop it in the oven for a few minutes, until it's all toasty and good. While you're waiting on your bread, taste your tomatoes to see if they need any more of your spices, and adjust if necessary.

To serve, place noodles on a plate. Top with hot tomatoes. Serve garlic bread alongside. (The Olive Garden recipe says to toss the tomatoes and pasta in a skillet and saute until heated through. You could do that to each serving if you want. I'm too lazy and ready to eat to do all that extra work.)

This is so good. After the four of us ate, I had enough leftovers for three or four more servings of pasta. All the garlic bread got eaten.

Did you know capellini pomodoro translates to tomato angel hair pasta in English? Yes? Ok. We'll get on with it, then.

Here's the recipe recap:

Capellini Pomodoro
Ingredients
6 (14 ounce) cans petite diced tomatoes
14 ounces angel hair (capellini) pasta
three or four cloves garlic, minced (depending on the size of the cloves)
6 Tablespoons olive oil
1 Tablespoon dried basil
Salt and pepper to taste

Directions
1. Bring a large pot of water to boil. Add pasta and cook until al dente. Drain.

2. Drain tomatoes.

3. Add tomatoes, garlic, olive oil, basil, salt and pepper to a skillet. Saute over medium heat.

4. Serve tomatoes over pasta.


Garlic Bread
Ingredients
8-10 slices bread
3-4 cloves garlic, minced (depending on the size of your cloves)
4 Tablespoons butter or margarine
1 teaspoon basil

Directions
1. Preheat oven to 350 degrees.

2. Add garlic and basil to butter. Mix well.

3. Spread butter over bread. Place on baking sheet.

4. Bake at 350 degrees 5-10 minutes, or until bread is toasted.

That's it, folks. Easy take out made at home.

Question of the day: What's your favorite pasta dish?

White Pizza with Garlic-Olive-Basil Pesto (31 Days: Day 6)

I love pizza of just about every kind. (I know, I told you that yesterday. I just REALLY LOVE pizza.) Thin crust, thick crust, regular crust. Pepperoni, cheese, supreme, veggie, Hawaiian, Chicken Bacon Artichoke (from Papa Murphy's - seriously delicious). I love this pizza, as well.

Both the sauce and toppings in today's post were born out of necessity. I have a very dear friend with a delicate stomach. She can't eat pizza with loads of tomato-based sauce on it. Her family was joining us for dinner one night, and I wanted to serve homemade pizza. I searched the internet for inspiration. This sauce is the result of that dilemma. The toppings are the result of needing something that would taste good with the sauce.

The sauce is a Garlic-Olive-Basil Pesto that is super easy to whip up, but it seems like you took longer to prepare it. I was making a garlic basil pesto to use as my sauce. I had already opened a can of what I thought were sliced black olives to top the pizzas with. What I discovered when I looked into the can was that I had actually opened a can of chopped olives. Have you ever seen canned chopped olives? They're chopped into such tiny pieces they should be classified as minced olives. Now I was stuck with olives that wouldn't work so great for topping pizza with, but I couldn't bear to throw them away. I threw them into my mini food processor with the rest of my pesto ingredients. It turned out great, if you like garlic and black olives. I'm sure if you hate olives (or garlic) you could leave either out and it would be fine, though you may have to use less olive oil if you do. I don't think I would recommend leaving both out, as I don't think this would work quite so well if you do. (Or maybe I'm wrong. If you try it and like it, let me know!)

Anyway, I'll quit yammering and get to the recipe now.

For the pesto, you'll need a can of chopped olives, dried basil, some minced garlic (I'm trying to use up this store-bought-in-a-jar minced garlic, so that's what I used for this. I'll be so glad when it's all gone.) and some olive oil. And a food processor or blender would make this a lot easier. (But you could get by without one if you had to. Just throw everything but the oil on a cutting board and mince it all together really well, then put it in a bowl with the oil and stir it up.)


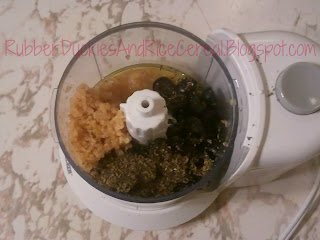
Put everything into the food processor or blender together. That's right, everybody into the pool.


Put the lid on it and give it a whirl or ten, until all the garlic and olives are cut up into teeny, tiny pieces and everything is mixed together real well.


That's it. Your pesto is now ready to spread on a pizza crust.


This is so good on white pizza, with tomatoes, onions, mushrooms and chopped baby spinach. I think it would go great on several other kinds of pizza. It would also be good made with roasted garlic and used as a dipping sauce for breadsticks or pizza crust.

Now, for the pizza toppings for our white pizza. You'll need some shredded cheese (I used Great Value Fiesta blend; it's my go-to all-purpose shredded cheese), canned sliced mushrooms, fresh diced tomatoes, chopped onions and chopped baby spinach. Plus your garlic-olive-basil pesto and pre-baked pizza crusts. (If you want to try making your own pizza crust, you can find my recipe for handmade pizza crust here.)


Spread the pesto onto your crust. Try to get a nice, even coating of olives and garlic over the entire crust.


Add all your veggies.


Add the cheese.


Bake at 425 degrees until your crust is done and cheese is all bubbly and melty and gooey. Like pizza cheese should be.

 That't it. You could swap this up and include any toppings you like. Artichokes and roasted chicken would be delicious with the pesto. So would just cheese, or cheese and tomatoes.

To recap:

Garlic-Olive-Basil Pesto
Ingredients
3 Tablespoons minced garlic in oil (or enough minced garlic cloves to make three tablespoons)
3 Tablespoons canned chopped olives (which equals out to less than a 4.25 ounce can)
1 Tablespoon dried basil
1 Tablespoon olive oil (you may need a little more than this if you use fresh garlic)

Directions
1. If using fresh garlic, mince into super-fine pieces.

2. Place all ingredient into food processor or blender and pulse until pesto is well mixed and emulsified.


White Pizza
Ingredients
2 large pizza crusts
Garlic-Olive-Basil Pesto sauce
1-2 tomatoes, diced
1 small onion, diced
1 (13.25 ounce) can mushrooms
1 cup chopped spinach
1 1/2 - 3 cups shredded cheese (depending on how much cheese you like on your pizza)

Directions
1. Spread pesto evenly over pizza crusts.

2. Add other toppings in even layers.

3. Top with shredded cheese.

4. Bake at 425 degrees for 10-20 minutes, or until pizza crusts are done and cheese is melted.

So easy, yet so good. The pesto is really just one step, unless you count opening cans and jars. The pizza is just four steps after you make the pesto. if you choose to make your own pizza crusts, you can prep everything else while the dough is rising and pre-baking. Since I began making pizza at home, we rarely go out for pizza. It's just that good.

What toppings do you think would go well with the pesto sauce?

Handmade Pizza Dough (31 Days: Day 5)

I make a lot of homemade pizzas. I usually use my bread machine to knead my pizza dough for me, so I can be lazy about it do other things while it's processing. Every once in a while when I haven't really thought about making had time to make my dough early enough in the day to use my bread machine, I have to resort to the old-fashioned method. It's a lot quicker than my machine, but a little more labor intensive.

This recipe makes enough dough for two large thin crust pizzas. If you like a thicker crust, you'll want to make one and a half recipes. For pan crust, I suggest doubling the recipe.

For this, you will need warm water, fast-acting yeast, salt, sugar, all purpose flour, olive oil (or vegetable oil if you don't have any olive oil), and any seasonings you want to add to your crust. I used Mrs. Dash Garlic
& Herb and onion powder. You'll also need non-stick spray and cornmeal for your pans.


Pour your water into a bowl and mix a little sugar in. Sprinkle the yeast over the water, but do not mix.


 Let sit for about ten minutes, until it gets all foamy.


Add the flour, salt, oil,  and any seasonings you would like to have baked into your crust.


Mix everything up well, until your dough forms into a ball. Knead your dough for several minutes, until it gets smooth and elastic. (And let's just pretend in this photo that I remembered to add my seasonings before mixing my dough. I didn't so I kneaded them in after I mixed everything else up.)


My dough, with seasonings kneaded in. 


Add a few drops of olive oil over your ball of dough and turn it over several times in the bowl to coat the dough evenly. This will keep your dough from sticking to your bowl.


Place your bowl in a warm spot, cover with a towel, and let it rise for twenty or thirty minutes, or until it's at least doubled. I like to turn my oven on a few seconds, just long enough to start heating it up, but not long enough to melt my bowl. Then I turn my oven off and pop my bowl of dough in there, uncovered.

After your dough has risen, dump it out on a floured surface. Knead it a few times, to work the extra oil into it, then cut it in half with a sharp knife.

Spray your pan with non-stick spray and dust it with cornmeal. Preheat your oven to 425 degrees.


Throw your dough on top of your pan and pat or roll it out to be slightly bigger than you want the finished pizza to be. Fold the edges over the pizza. I like to crimp the edges down with a fork, just so it'll be more likely to stay. Poke your dough with a fork.


My son insisted I make him his very own "little" pizza, so I did.


Bake your crusts for 10 minutes or so. This will help keep them from getting too soggy. Then you can top your pizza with whatever you'd like and bake it for another 10-20 minutes.

OK, kiddos, recap time.

Pizza Dough (handmade, enough for two large thin crust pizzas)
Ingredients
2 1/2 cups all-purpose flour
1 (0.25 ounce) package yeast
1 Tablespoon sugar
1/4 teaspoon salt
1 cup warn water
1 Tablespoon olive oil, plus 1/2 teaspoon for coating dough while rising
1/4 teaspoon garlic powder (optional)
1/4 teaspoon onion powder (optional)
Cornmeal

Directions
1. Mix sugar in warm water. Sprinkle yeast on top and wait 10 minutes.

2. Add flour, salt, oil and seasonings. Combine.

3. Knead 6-8 minutes, or until smooth and elastic. Coat with olive oil. Cover and let rise 30 minutes.

4. Grease pans. Sprinkle with cornmeal. Preheat oven to 425 degrees.

5. Knead dough a few times to incorporate the oil coating.

6. Divide  your dough and pat or roll it out onto pans, making it a little bigger than the desired size of the finished crust. Fold the edges over and crimp to seal. Prick crust with a fork.

7. Bake at 425 degrees for 10 minutes.

8. Remove from oven. Add desired pizza sauce and toppings. Return to oven for an additional 10 to 20 minutes, or until crust is cooked through and cheese is melted.

Today's question : What pizza toppings are your favorites? Do you like plain cheese pizza? Pepperoni? Supreme? Meat lover's? Hawaiian? Margherite? Veggie? White pizza with spinach? (Personally, I love pizza. Period. Just about any toppings, with the exceptions of hot peppers and anchovies. But if you like them, that's OK. Different strokes, and all that.)

Tomorrow, I'll bring you my recipe for White Pizza, complete with my Garlic-Olive-Basil Pesto recipe that I use as the sauce on this delectable delight.

Slow Cooker Chili (31 Days: Day 4)

Everyone has their own chili recipe. This is mine. Not too spicy, not completely bland.

You'll need chili ready diced tomatoes, regular diced tomatoes, diced tomatoes with green chilies,  canned kidney beans, three pounds of ground beef, and chili seasoning.


Brown your ground beef in a skillet. I use a potato masher to help crumble the meat up. It makes it a lot easier.


Drain your ground beef.


Drain and rinse your beans. Add beans, tomatoes, chili seasoning and meat to your slow cooker.


Stir everything together and cook on low for 4-6 hours, to let all the vegetables and meat get permeated with chili flavor. (Or you could cook until it's heated through, since the meat is already cooked.)


That's it. Serve with saltine crackers, grilled cheese sandwiches, or cornbread. I like to top mine with a little shredded cheese, also.

Ready? Let's recap all that.

Ingredients:
3 pounds ground beef
2 cans chili ready diced tomatoes
1 can regular petite diced tomatoes
1 can diced tomatoes with green chilies (A.K.A. Ro-Tel)
2 cans kidney beans
2 packs chili seasoning

Directions:
1. Brown crumbled ground beef in a skillet. Drain.

2. Drain and rinse two cans kidney beans.

3. Throw everything in the slow cooker. Set the temperature on low and walk away for 4-6 hours.

4. Serve with saltine crackers, grilled cheese sandwiches or cornbread. Top with shredded cheese if desired.

There. Easy, and delicious. Just what you need to warm you up on a crisp Autumn evening.

What do you like to put in your chili? Do you use anything different to top yours with?

***Please note, I have listed the links for days 5 and 6 on my 31 Days of Food lists, but the links will not be active until 12:00 AM on October 5 and 6. We have doctor's appointments for my boyfriend (100 miles away from our home, one-way) and I will not be available to add the links on those days. I want you to have access to the links from both the 31 Days of Food blog post and 31 Days of Food page my blog menu links to, so I'm posting the links early. Think of it as a surprise sneak peak at the next couple of recipes.

**Disclaimer - I am not affiliated with the companies that own the products pictured in any way. That's just the brands I happened to have in my kitchen when I cooked these. If another brand had been on sale cheaper the day I bought these ingredients, then that's what I would have bought.

Breakfast Tacos (31 Days: Day 3)

I've brought you two dinner recipes, now it's time for a breakfast recipe.

Breakfast in our house is usually some kind of eggs (fried, scrambled, boiled) with some kind of bread (usually toast). Often, I will make a egg sandwich with my fried or scrambled eggs. One day, I wanted something different. I searched the fridge and came up with some tortillas, eggs, shredded cheese, salsa, leftover diced tomatoes and leftover taco meat. I pondered the wisdom of the experiment upon which I was about to embark. I decided leftover taco meat should be a good substitute for crumbled sausage in a breakfast burrito, and began cracking eggs. this is the result.

You will need flour tortillas, eggs, shredded cheese, salsa, leftover diced tomatoes and leftover taco meat (I know, I've already given out that list above. I just wanted to reiterate.)

Beat eggs and add to a skillet over medium heat. Add the taco meat and tomatoes. Scramble.


Divide eggs among flour tortillas.


Top with shredded cheese and salsa. Roll up and serve.


These were good! They were also a good way to use up the little bit of taco meat we had left from dinner the night before (it MIGHT have been enough for ONE taco).

To recap:
Ingredients:
8 eggs
about 1 cup of leftover taco meat
about 1/2 cup leftover diced tomatoes
4 flour tortillas, burrito size
shredded cheese
salsa

Directions:
1. Beat eggs. Pour into skillet over medium heat. Add taco meat and tomatoes. Cook until eggs are done.

2. Divide eggs between four tortillas. Top with salsa and shredded cheese. Serve warm.

Japanese Curry and Rice (31 Days: Day 2)

My boyfriend was stationed in Japan with the Navy for three years. Do I even need to tell you he LOVES good Asian cuisine? In an attempt to please his palate I have been adding Asian dishes to my list of recipes that I can make for the past several months. Pinterest has helped me quite a bit with this, as there are many recipes pinned for Asian cuisine. I could (and have been known to) spend hours on Pinterest repinning recipes.

One of my favorite recipes to cook at home is Japanese Curry. It's different from Indian curry, much sweeter and less spicy. I'm not a fan of spicy curry, but this? This stuff holds a special place near my heart.

I could talk for several more minutes about my love for this dish, and Asian cuisine in general, but then we'd never get to the recipe and pictures. Are you ready? Let's get cooking. (FYI - I modified someone else's recipe to my liking, since my child will NOT EAT ONIONS. He did not get that from me, I swear. Anyway, the original recipe can be found here, if you're interested. Just wanna give credit where credit is due.)

For this you'll need some cooked, cubed chicken breast, carrots, potatoes, curry powder mix, and water. I buy Golden Curry at Publix, on the aisle with the other Asian foods. And while we're at it, go ahead and start  enough rice cooking to make four or six servings. (I use a rice steamer. The ratio for it is one and a half cups of white rice to three cups of water. This equals out to be a cup of water for every half cup of rice, which is about the same as you use when cooking rice in a pot on the stove.)


Peel and dice your carrots.


And potatoes.


Place them in a large pot with enough water to cover (about 3 or 4 cups). Bring to a boil, then reduce heat and let simmer until vegetables start softening (10-15 minutes).


Add the chicken. Break the curry mix into pieces (it comes in a brick) and add to the pot.


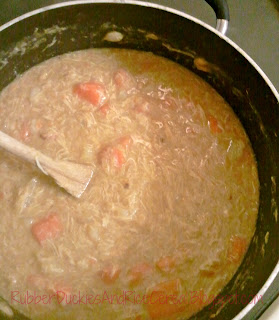
Stir everything up well, until the curry mix dissolves.


The curry mix will thicken everything up in a few minutes, and your dish will turn brown. (It usually gets browner than my pictures show. I didn't use the entire package of curry mix, because I had already used part of my pack making curry previously, and I forgot to buy more when I went shopping. You should use the whole pack. It tastes better that way.)

Serve over rice.

 A lot of times I serve Egg Rolls with this. (You'll have to visit the link to get the recipe. It's not mine, so I'm not gonna post it here.) In the recipe I linked to, chicken is used. Sometimes I omit that to save money and hassle. If you do, just use a little more cabbage and carrots to make up for the volume of chicken. They're really easy to make, and everyone I've ever served them to says they taste better than restaurant egg rolls.

You can also serve homemade Sweet and Sour sauce (recipe below) to go along with the egg rolls. I was desperate one night for some to dip my egg rolls in, but I was out of the store-bought variety. I searched the internet for a recipe that I already had all the ingredients to and came up with this one. It has a good flavor, but doesn't taste anything like store bought sweet and sour sauce, or the sauce served at most Asian restaurants.

OK, now on to the recap.

Ingredients
1 pound chicken, cooked and chopped
3 medium baking potatoes
5 medium carrots
1 (3.5 ounce) package golden curry mix
3-4 cups water
4-5 cups cooked short-grain white rice

Directions
1. Peel and chop carrots and potatoes. Place in pot and add water. Bring to a boil, then reduce hear and simmer 10-15 minutes.

2. Add chicken and curry mix. Stir until mix is dissolved and curry begins to thicken. Remove from heat once chicken is heated through.

3. Serve over cooked white rice.
Makes about 4 servings.

Sweet and Sour Sauce
Ingredients
3 Tablespoons white sugar
1 Tablespoon + 1 teaspoon white vinegar
2 Tablespoons + 2 teaspoons water
1 Tablespoon soy sauce
1 1/2 teaspoons cornstarch

Directions
Mix all ingredients in a small sauce pan, stirring until there are no lumps. Bring to a boil. Stir until thickened.
Makes 1/2 cup (4 servings).


Once again, these leftovers are delicious the next day. I store the rice and curry in separate bowls in my fridge.

Do you have a different way to make Japanese Curry? Or a different sweet and sour sauce or egg roll recipe?

**Disclaimer - I am not affiliated with the companies that own the products pictured in any way. That's just the brands I happened to have in my kitchen when I cooked these. If another brand had been on sale cheaper the day I bought these ingredients, then that's what I would have bought.
 
Template designed using TrixTG